lans.cloud

Random Bodyweight Workout Generator

Generate a random bodyweight workout by difficulty, focus area, and duration. No equipment required.

Workout Settings

Excludes jumping and plyometrics

Ready to sweat?

Configure your settings on the left and click Generate to build a custom bodyweight workout.

Why Bodyweight Training Works

Bodyweight training, or calisthenics, is one of the most effective and accessible ways to build strength, increase mobility, and improve cardiovascular health. Unlike traditional gym workouts that require machines or free weights, bodyweight exercises use your own mass as resistance. This means you can train anywhere—at home, in a hotel room, or at the park. Research shows that high-intensity bodyweight circuit training can match or even exceed the calorie-burning effects of traditional steady-state cardio, all while building functional muscle.

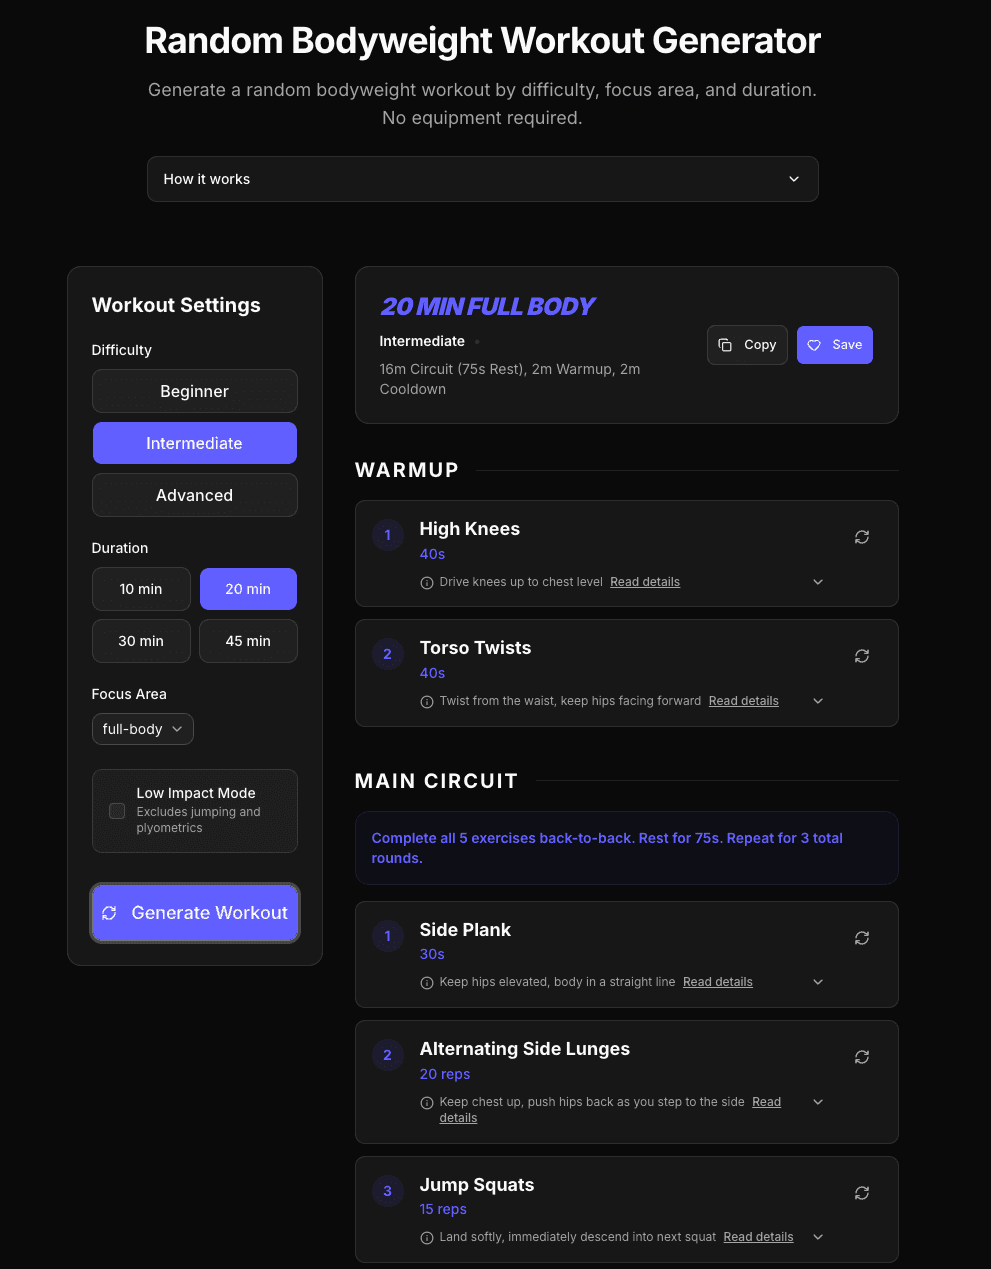
How This Workout Generator Works

Our random workout generator takes the guesswork out of your fitness routine. By selecting your desired difficulty (Beginner, Intermediate, or Advanced), your target muscle focus, and the time you have available, the algorithm dynamically constructs a balanced circuit. It automatically calculates the optimal number of exercises per round, structures your warmup and cooldown, and scales the rest periods. We've programmed the engine with a database of highly effective movements to ensure you get a challenging and safe session every time.

Tips for Beginners and Progression

If you are new to working out, always start with the Beginner difficulty and a shorter duration, like 10 or 20 minutes. Focus entirely on your form rather than speed. If an exercise feels too difficult, use the "Swap" button to find a suitable alternative, or reduce your range of motion. To ensure you continue making progress (a principle known as progressive overload), gradually increase your session duration, switch to a higher difficulty setting to unlock more advanced variations, or consciously reduce the rest time between your rounds.

Circuit Structure Explained

Circuit training is incredibly time-efficient. A circuit involves performing a series of exercises back-to-back with minimal rest. Once you complete all the exercises in the sequence, you take a longer rest break before repeating the entire block for several "rounds." This keeps your heart rate elevated, blending strength training with cardiovascular conditioning. Our generator automatically sets a structured warmup to prepare your joints, followed by the main circuit, and concludes with a dedicated cooldown period to kickstart recovery.

Comprehensive Exercise Glossary

To get the most out of your random bodyweight workout, it is crucial to perform each movement with proper form. Poor form not only reduces the effectiveness of the exercise but can also lead to injury. Below is a detailed guide on how to correctly perform every exercise in our database.

Warmup Exercises

Arm Circles

Tip: Keep arms straight, make controlled circles

  1. Stand tall with your feet shoulder-width apart and extend your arms straight out to the sides at shoulder height.
  2. Keeping your arms straight and your core engaged, begin making small, controlled forward circles.
  3. Gradually increase the size of the circles until you are making large sweeping motions.
  4. After half the time has elapsed, reverse the direction to make backward circles.

Torso Twists

Tip: Twist from the waist, keep hips facing forward

  1. Stand with your feet slightly wider than shoulder-width apart, knees slightly bent.
  2. Hold your arms out to the sides, or bend your elbows holding your hands near your chest.
  3. Keeping your hips and lower body completely still, twist your torso as far to the left as comfortable.
  4. Smoothly rotate back through the center and twist to the right, continuing this fluid motion.

High Knees

Tip: Drive knees up to chest level

  1. Stand tall with your feet hip-width apart, keeping your chest up and core tight.
  2. Lift your right knee as high as you can toward your chest while driving your left arm forward.
  3. Lower your right foot to the ground and immediately repeat the motion with your left knee and right arm.
  4. Focus on a brisk, rhythmic marching pace to elevate your heart rate while keeping the impact low.

Jumping Jacks

Tip: Land softly on the balls of your feet

  1. Stand tall with your legs together and arms flat at your sides.
  2. In one explosive motion, jump your feet out wider than shoulder-width while sweeping your arms out and up over your head.
  3. Immediately jump back to the starting position, lowering your arms back to your sides.
  4. Maintain a steady rhythm and ensure you land softly on the balls of your feet to protect your joints.

Butt Kicks

Tip: Kick heels up towards your glutes quickly

  1. Stand tall with your feet about hip-width apart and engage your core.
  2. Begin jogging in place, but instead of bringing your knees up, forcefully kick your heels back and up toward your glutes.
  3. Pump your arms in rhythm with your legs to maintain balance and speed.
  4. Keep your chest up and try to land softly on the balls of your feet with each step.

Inchworms

Tip: Walk hands out to a plank, keep legs straight

  1. Stand tall with your feet hip-width apart. Hinge at your hips and reach your hands toward the floor, bending your knees slightly if needed.
  2. Walk your hands forward slowly, keeping your legs as straight as possible, until you reach a high plank (push-up) position.
  3. Hold the plank for a brief second, ensuring your core is tight and your body forms a straight line.
  4. Walk your hands back toward your feet and return to a standing position to complete the rep.

Squat Reaches

Tip: Squat down, then stand and reach high

  1. Stand with your feet shoulder-width apart, toes pointing slightly outward.
  2. Push your hips back and bend your knees to lower into a deep squat, keeping your chest up.
  3. As you hit the bottom of the squat, tap the floor with your fingertips.
  4. Explode upward to a standing position, coming up onto your toes, and reach both arms straight up toward the ceiling.

Leg Swings

Tip: Hold a wall for balance, swing leg loosely

  1. Stand sideways next to a wall or sturdy object and lightly hold it for balance.
  2. Shift your weight onto your standing leg, keeping it slightly bent.
  3. Swing your outside leg forward and backward in a controlled but loose pendulum motion, letting momentum guide the stretch.
  4. After the designated time or reps, turn around and repeat the movement with your other leg.

Main Circuit Exercises

Pull-ups / Inverted Rows

Tip: Use a sturdy door frame or bar if available, or do sliding floor pulldowns

  1. If using a bar: Grip the bar slightly wider than shoulder-width. Hang with your arms fully extended.
  2. Pull your chest to the bar by driving your elbows down and back, squeezing your shoulder blades together.
  3. Lower yourself back to the starting position with control.
  4. If using the floor (sliding pulldowns): Lie on your stomach on a smooth floor with a towel under your hands. Pull your body forward by driving your elbows down, then push back.

Push-ups

Tip: Keep core tight, body in a straight line

  1. Start in a high plank position with your hands slightly wider than shoulder-width apart.
  2. Lower your body until your chest nearly touches the floor, keeping your elbows tucked at about a 45-degree angle.
  3. Push back up to the starting position powerfully.
  4. Maintain a straight line from your head to your heels (or knees, if modifying) throughout the movement, never letting your lower back sag.

Chair Dips (Straight Legs)

Tip: Keep back close to the chair, lower until elbows are 90 degrees

  1. Sit on the edge of a sturdy chair or bench and place your hands firmly on the edge next to your hips.
  2. Slide your hips off the edge, supporting your weight with your arms. Extend your legs forward (bend knees to make it easier).
  3. Lower your body by bending your elbows until they reach a 90-degree angle, keeping your back close to the chair.
  4. Push back up to the starting position by extending your arms fully.

Pike Push-ups

Tip: Keep hips high, lower head towards the floor

  1. Start in a downward dog or pike position: hands and feet on the floor with your hips pushed high up toward the ceiling.
  2. Your body should form an inverted V shape. Keep your legs as straight as your flexibility allows.
  3. Bend your elbows to lower the top of your head toward the floor, slightly in front of your hands.
  4. Push back up to the starting position, maintaining the high hip angle to target your shoulders.

Plank Up-Downs

Tip: Minimize hip sway as you move up and down

  1. Start in a standard forearm plank position with your core tight and body in a straight line.
  2. Place your right hand on the floor where your right elbow was, and push up. Follow with your left hand to arrive in a high plank.
  3. Lower back down to your right forearm, followed by your left forearm.
  4. Keep your hips as still as possible during the transition. Alternate your leading arm each rep.

Plank Shoulder Taps

Tip: Minimize hip sway as you tap your shoulders

  1. Start in a high plank position with your hands directly under your shoulders and feet shoulder-width apart.
  2. Keeping your core tightly engaged and your hips as still as possible, lift your right hand and tap your left shoulder.
  3. Return your right hand to the floor and immediately lift your left hand to tap your right shoulder.
  4. Continue alternating sides at a controlled pace, focusing on anti-rotation of your torso.

Single-Leg Calf Raises

Tip: Push up onto toes, hold for a second, lower slowly

  1. Stand up straight with your feet hip-width apart. Hold onto a wall or chair for balance if needed.
  2. Slowly push through the balls of both feet to raise your heels as high as you can.
  3. Hold the top position for a brief second, strongly squeezing your calf muscles.
  4. Slowly and with control, lower your heels back to the ground.

Alternating Side Lunges

Tip: Keep chest up, push hips back as you step to the side

  1. Stand with your feet together and your hands clasped in front of your chest.
  2. Take a wide step to your right side. As your foot lands, push your hips back and bend your right knee into a lunge.
  3. Keep your left leg completely straight and your chest lifted.
  4. Push off your right foot to return to the starting position, then repeat on the left side.

Bodyweight Squats

Tip: Keep chest up, push hips back

  1. Stand with your feet slightly wider than shoulder-width apart, toes pointing slightly outward.
  2. Engage your core and push your hips back as if you are sitting into a chair, bending at the knees.
  3. Lower yourself until your thighs are parallel to the floor (or as low as comfortable).
  4. Push powerfully through your heels to return to a standing position, squeezing your glutes at the top.

Forward Lunges

Tip: Step far enough so front knee does not pass toes

  1. Stand tall with your feet hip-width apart and your hands on your hips.
  2. Take a large step forward (or backward for reverse lunges) with your right leg.
  3. Lower your hips until both knees are bent at a 90-degree angle. Your back knee should hover just above the ground.
  4. Push off your right foot to return to the starting position, then alternate to the other leg.

Single-Leg Glute Bridges

Tip: Squeeze glutes at the top, avoid overextending back

  1. Lie on your back with your knees bent and feet flat on the floor, close to your glutes.
  2. Rest your arms at your sides with your palms facing down.
  3. Push through your heels to lift your hips toward the ceiling until your body forms a straight line from your shoulders to your knees.
  4. Squeeze your glutes hard at the top, then slowly lower your hips back to the floor.

Wall Sit

Tip: Thighs parallel to floor, back flat against wall

  1. Stand with your back flat against a sturdy wall and your feet about two feet in front of you.
  2. Slide your back down the wall until your knees are bent at a 90-degree angle, as if sitting in a chair.
  3. Ensure your knees are directly above your ankles, not pushed forward over your toes.
  4. Keep your core tight and back pressed into the wall for the entire duration.

Jump Squats

Tip: Land softly, immediately descend into next squat

  1. Start in a standard squat position, with feet slightly wider than shoulder-width apart.
  2. Lower down into a squat, pushing your hips back.
  3. Explode upward forcefully, pushing through your feet to jump as high as you can off the floor.
  4. Land softly on the balls of your feet and immediately transition back into the next squat to absorb the impact.

Bulgarian Split Squats

Tip: Keep your chest up and lower your back knee straight down

  1. Stand a couple of feet in front of a chair or bench, facing away from it.
  2. Reach one foot back and place the top of your foot on the seat of the chair.
  3. Keeping your chest upright, bend your front knee to lower your body until your front thigh is parallel to the floor.
  4. Push forcefully through the heel of your front foot to return to the starting position. Complete all reps on one side before switching.

Superman Raises

Tip: Squeeze glutes and lower back to lift arms and legs

  1. Lie face down on the floor with your arms fully extended in front of you and legs straight behind you.
  2. Simultaneously lift your arms, chest, and legs off the floor by squeezing your glutes and lower back.
  3. Hold the top position for a brief second, feeling the contraction in your posterior chain.
  4. Slowly lower back down to the starting position.

Side Plank

Tip: Keep hips elevated, body in a straight line

  1. Lie on your side with your legs straight and stacked on top of each other.
  2. Prop yourself up on your bottom forearm, keeping your elbow directly under your shoulder.
  3. Lift your hips off the floor until your body forms a straight line from your head to your feet.
  4. Engage your core and hold this position, ensuring your hips don't drop.

Flutter Kicks

Tip: Press lower back into the floor, keep legs straight

  1. Lie on your back with your legs fully extended and arms resting by your sides (or tucked under your glutes for lower back support).
  2. Press your lower back firmly into the floor and lift both legs a few inches off the ground.
  3. Keep your legs straight and alternate lifting them up and down in a small, rapid fluttering motion.
  4. Maintain continuous tension in your lower abs and never let your heels touch the floor during the set.

Forearm Plank

Tip: Keep a straight line from head to heels

  1. Position yourself facedown on the floor, resting on your forearms (or hands) and toes.
  2. Keep your elbows directly under your shoulders and your body in a perfectly straight line.
  3. Engage your core by pulling your belly button toward your spine and squeeze your glutes.
  4. Hold this position rigidly, breathing normally, without letting your hips sag or hike up.

Bicycle Crunches

Tip: Lift shoulder blades off the floor, keep neck neutral

  1. Lie on your back with your knees bent and feet flat on the floor, hip-width apart.
  2. Place your hands lightly behind your head, or cross them over your chest.
  3. Contract your abs to lift your shoulder blades a few inches off the floor.
  4. Pause for a moment at the top of the contraction, then slowly lower back down.

Lying Leg Raises

Tip: Press lower back into the floor, lower legs slowly

  1. Lie on your back with your legs straight and arms by your sides.
  2. Press your lower back firmly into the floor and keep it there for the entire movement.
  3. Lift both legs together until they form a 90-degree angle with your torso.
  4. Slowly and with control, lower your legs back toward the floor, stopping just before your lower back tries to lift off the ground.

Russian Twists (Feet Raised)

Tip: Lean back slightly, twist from the torso

  1. Sit on the floor with your knees bent and heels touching the ground (or lifted for a challenge).
  2. Lean your torso back to a 45-degree angle, keeping your spine straight and core engaged.
  3. Clasp your hands together in front of your chest.
  4. Twist your torso to the right, attempting to touch the floor beside your hip, then immediately twist to the left.

Dead Bugs

Tip: Keep your lower back glued to the floor

  1. Lie on your back with your arms extended straight up toward the ceiling and your knees bent at 90 degrees (tabletop position).
  2. Press your lower back firmly into the floor—do not let it arch at any point during the movement.
  3. Slowly extend your right leg straight out to hover above the floor while simultaneously reaching your left arm back over your head.
  4. Return to the starting position and repeat with the opposite arm and leg. Move slowly and with control.

Plank Jacks

Tip: Keep hips steady while jumping feet in and out

  1. Start in a high plank position with your hands under your shoulders and your body in a straight line.
  2. Keeping your core engaged and your hips as steady as possible, jump both feet out wide.
  3. Immediately jump them back together.
  4. Maintain a quick, steady pace without letting your lower back dip toward the floor.

High Knees

Tip: Drive knees up quickly, pump arms

  1. Stand tall with your feet hip-width apart and your chest lifted.
  2. Begin running in place, driving your knees up as high as possible (aiming for waist level).
  3. Pump your arms vigorously in coordination with your legs to maintain momentum.
  4. Land softly on the balls of your feet and keep the pace as fast as you can safely manage.

Burpees

Tip: Drop down, kick feet back, do a push-up, jump up

  1. Start in a standing position with your feet shoulder-width apart.
  2. Drop into a squat and place your hands on the floor in front of you.
  3. Kick your feet back to land in a plank position, and optionally perform a push-up.
  4. Quickly jump your feet back toward your hands, stand up, and leap into the air with your arms reaching overhead.

Mountain Climbers

Tip: Keep hips down, drive knees towards chest

  1. Start in a high plank position with your hands directly under your shoulders and body straight.
  2. Quickly drive your right knee toward your chest without letting your hips hike up.
  3. As you return your right foot to the starting position, simultaneously drive your left knee toward your chest.
  4. Continue alternating legs at a fast, running pace while keeping your core tight.

Bear Crawl

Tip: Keep back flat, knees close to the ground

  1. Start on your hands and knees in a tabletop position.
  2. Lift your knees slightly off the ground so you are balancing on your hands and toes. Keep your back completely flat.
  3. Move your right hand and left foot forward at the same time, then follow with your left hand and right foot.
  4. Crawl forward (and backward, if space permits) while maintaining the low, flat-back position.

Skater Jumps

Tip: Leap side to side, land softly on a bent knee

  1. Start in a slight squat position. Push off your right foot to leap to your left, landing softly on your left foot.
  2. As you land, sweep your right leg behind your left leg and reach your right hand toward the floor (like a speed skater).
  3. Immediately push off your left foot to leap back to the right side, landing on your right foot and sweeping your left leg behind.
  4. Continue bounding side-to-side fluidly.

Broad Jumps

Tip: Use your arms for momentum, land softly in a squat

  1. Stand with your feet shoulder-width apart, load your hips by squatting down slightly, and swing your arms back.
  2. Explosively throw your arms forward and jump as far forward as you can.
  3. Land softly on both feet, dropping immediately into a squat to absorb the impact.
  4. Turn around or quickly shuffle back to your starting point and repeat.

Cooldown Exercises

Child's Pose

Tip: Sit back on heels, stretch arms forward, breathe deeply

  1. Kneel on the floor with your toes together and your knees hip-width apart.
  2. Exhale and lower your torso between your knees, extending your arms straight out in front of you.
  3. Rest your forehead on the floor and relax your shoulders away from your ears.
  4. Take slow, deep breaths, feeling your lower back and lats stretch and release.

Standing Quad Stretch

Tip: Keep knees together, pull heel to glute

  1. Stand tall, holding onto a wall or chair for balance if needed.
  2. Bend your right knee, bringing your right heel up toward your glutes.
  3. Reach back with your right hand and grab your ankle. Keep your knees close together.
  4. Gently pull your heel closer to your body while pushing your hips slightly forward to deepen the stretch in your quad.

Forward Fold

Tip: Hinge at the hips, let your upper body hang heavy

  1. Stand with your feet hip-width apart and keep a slight, soft bend in your knees.
  2. Exhale as you hinge forward at the hips, keeping your torso long.
  3. Let your arms hang loosely toward the floor or cross them and hold opposite elbows.
  4. Let your head hang heavy, relieving tension in your neck, and breathe deeply into the stretch.

Cross-Body Shoulder Stretch

Tip: Pull arm across chest gently

  1. Stand or sit comfortably with a tall spine.
  2. Bring your right arm straight across your chest, keeping it below chin height.
  3. Use your left hand or forearm to gently pull the right arm closer to your body.
  4. Hold the stretch, feeling it in the back of your shoulder, then switch sides.

Cobra Stretch

Tip: Keep hips on the floor, gently arch back

  1. Lie flat on your stomach with your legs extended straight back and hands flat on the floor under your shoulders.
  2. Keeping your hips and thighs pressed into the floor, inhale and slowly press into your hands to lift your chest.
  3. Keep your elbows slightly bent and tucked close to your body. Look straight ahead or slightly upward.
  4. Hold the stretch, focusing on lengthening the front of your torso without pinching your lower back.

Seated Hamstring Stretch

Tip: Reach for toes, keep back relatively straight

  1. Sit on the floor with both legs extended straight out in front of you.
  2. Inhale and sit up tall, lengthening your spine.
  3. Exhale and hinge forward from your hips, reaching your hands toward your shins, ankles, or toes.
  4. Avoid aggressively rounding your back; focus on bringing your chest toward your knees.

Cat-Cow

Tip: Arch your back up, then dip it down smoothly

  1. Start on your hands and knees in a tabletop position, with your wrists under your shoulders and knees under your hips.
  2. Inhale as you drop your belly toward the mat, lift your chin and chest, and broaden your collarbones (Cow Pose).
  3. Exhale as you draw your belly to your spine and round your back toward the ceiling, tucking your chin to your chest (Cat Pose).
  4. Move fluidly between these two poses, matching the movement with your breath.

Wall Calf Stretch

Tip: Press heel into the ground, lean into the wall

  1. Stand facing a wall, about arm's length away. Place both hands flat against the wall at shoulder height.
  2. Step your right foot back about two feet, keeping the leg straight and planting the heel firmly on the ground.
  3. Bend your left knee and lean your weight forward toward the wall.
  4. You should feel a strong stretch in the calf of your straight right leg. Hold, then switch sides.
Random bodyweight workout generator showing a 20-minute full-body plan with warmup and circuit
A complete session — warmup, circuit, and cooldown — built from your difficulty, focus, and time.

Frequently Asked Questions

Do I need any equipment for these workouts?

No — every exercise uses only your body weight. Train in a living room, hotel room, or park. Some advanced variations mention optional support like a chair or wall, and the plan flags those clearly.

How long should a beginner bodyweight workout be?

Start with 10–20 minutes on the Beginner setting and focus on form over speed. The generator scales exercise counts, rest periods, and movement difficulty to the level you pick, so progression is as simple as choosing a longer session or the next difficulty up.

What if I can’t do one of the exercises?

Hit the swap button next to any movement and the generator replaces it with a suitable alternative for the same slot — no need to regenerate the whole workout. Every exercise also has step-by-step instructions under "Read details".

Can I save a workout I like?

Yes — Save stores up to ten favorites in your browser, and your last workout is always available to resume. Copy exports the full plan as text for your notes app or a training partner.

Is there a quiet option for apartments?

Yes — enable Low Impact Mode and the generator excludes jumping and plyometric movements, keeping the session downstairs-neighbor-friendly while still hitting the same muscle groups.